Difference between revisions of "AardRock Wiki:Presents"
Jump to navigation
Jump to search
(Initial version.) |
m (Replaced 'appeltje' wtih '⌘') |
||
| (4 intermediate revisions by 2 users not shown) | |||
| Line 1: | Line 1: | ||
=Presentations= | |||
* [http://www.aardrock.com/The-Nature-Of-Order-Verbeelding/ The Nature Of Order]—Fifteen Fundamental Properties for a Whole World | |||
* [http://cheetah.aardrock.com/Cheetah-Zomer-2006-Presentatie/ Cheetah]—Lekker in je vel met diabetes | |||
=Presentation Style= | |||
Default style for AardRock presentations ('''subject to change'''): | Default style for AardRock presentations ('''subject to change'''): | ||
* All sizes in pixels, unless otherwise specified. | * All sizes in pixels, unless otherwise specified. | ||
* All dimensions in WxH. | * All dimensions in WxH. | ||
* All color definitions are in RGB (255/255/255). | * All color definitions are in RGB (255/255/255). | ||
* All fonts from Sun family ([http://aardrock.com/ | * All fonts from Sun family ([http://aardrock.com/font/ Download your Mac or PC font] ). | ||
* All font sizes in points. | * All font sizes in points. | ||
* Origin is upper left (0, 0). | * Origin is upper left (0, 0). | ||
| Line 9: | Line 13: | ||
* Overal underlying grid 24x24. | * Overal underlying grid 24x24. | ||
* Most text and images are snapped to grid. | * Most text and images are snapped to grid. | ||
* Underlying snap grid 12x12 (so you have | * Underlying snap grid 12x12 (so you have finer control of placement). | ||
* Black background. | * Black background. | ||
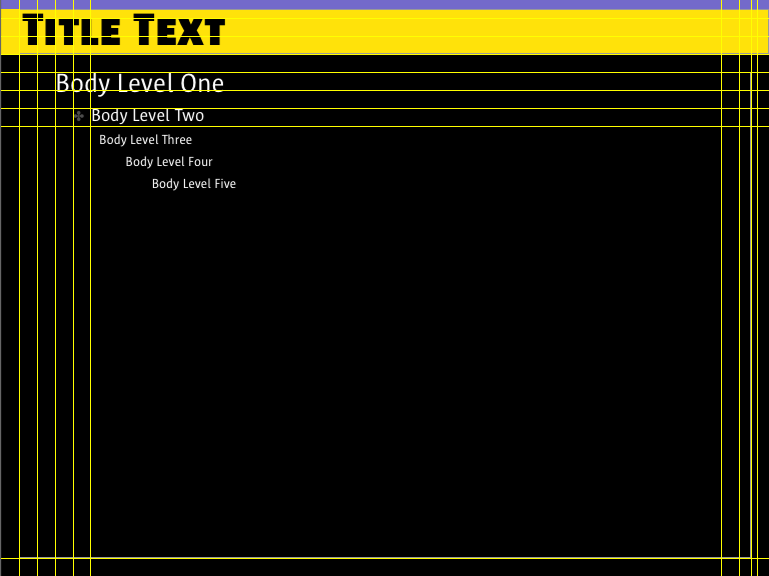
* Purple (111/106/202) horizontal strip 0 px from top, 1024x12. | * Purple (111/106/202) horizontal strip 0 px from top, 1024x12. | ||
| Line 22: | Line 26: | ||
[[Image:AardRockPresents.png]] | [[Image:AardRockPresents.png]] | ||
=Vistas and SubPanels for Home Pages= | |||
To create subpanel 3: | |||
*create new Blank File: size 264 x 96 px, 72 dpi, transparent background | |||
*open template | |||
*copy desired picture to clipboard | |||
*paste into PS document | |||
*make Cut Form layer highest layer | |||
*select picture layer | |||
*⌘-T (free transform) | |||
*drag and resize according to desire, add any text | |||
*select Cut Form layer | |||
*use Magic Wand, Set tolerance = 0 on cut form part | |||
*select inverse (apple shift i) | |||
*select Image layer | |||
*Layer > New Layer via Copy (apple J) | |||
*hide Cut Form layer and original image layer (eyes shut) | |||
*save for web | |||
Latest revision as of 19:54, 11 September 2006
Presentations
- The Nature Of Order—Fifteen Fundamental Properties for a Whole World
- Cheetah—Lekker in je vel met diabetes
Presentation Style
Default style for AardRock presentations (subject to change):
- All sizes in pixels, unless otherwise specified.
- All dimensions in WxH.
- All color definitions are in RGB (255/255/255).
- All fonts from Sun family (Download your Mac or PC font ).
- All font sizes in points.
- Origin is upper left (0, 0).
- Slide size 1024x768.
- Overal underlying grid 24x24.
- Most text and images are snapped to grid.
- Underlying snap grid 12x12 (so you have finer control of placement).
- Black background.
- Purple (111/106/202) horizontal strip 0 px from top, 1024x12.
- Yellow (255/255/17) horizontal strip 12 px from top, 1024x60.
- Text frame for bullet lists have origin at (24, 96), size 976x648.
- Title font: Sun SC Black 62.
- Sublevels do not use bullets.
- Level 1: Sun Regular 36, space before 12, indent +12 relative to previous level.
- Level 2: Sun Regular 24, space before 12, indent +12 relative to previous level.
- Level 3: Sun Regular 18, space before 12, indent +12 relative to previous level.
- Use three levels max.
Vistas and SubPanels for Home Pages
To create subpanel 3:
- create new Blank File: size 264 x 96 px, 72 dpi, transparent background
- open template
- copy desired picture to clipboard
- paste into PS document
- make Cut Form layer highest layer
- select picture layer
- ⌘-T (free transform)
- drag and resize according to desire, add any text
- select Cut Form layer
- use Magic Wand, Set tolerance = 0 on cut form part
- select inverse (apple shift i)
- select Image layer
- Layer > New Layer via Copy (apple J)
- hide Cut Form layer and original image layer (eyes shut)
- save for web
